
What is available now?
The free demo uses a fixed sample shape, regardless of the uploaded image. It does not convert your photo or send it to an external image service. Photo-based generation is planned for Pro and is not available yet. Purchasing is closed.
This guide explains the intended photo-to-crochet process and the actual recorded research example below. That recorded conversion is separate from the current free demo. See available features and planned Pro access.
What does this tool create from a photo?
Photo to Crochet proposes a draft for a 3D crochet project, such as an amigurumi toy. You review a target shape, then explore the available construction preview and associated English making instructions. Some shapes or steps can remain unresolved.
A photo does not contain the original object's complete construction. Hidden surfaces, small features and proportions may need interpretation. The goal is a crochet version you can inspect, with its limits in view.
One recorded photo conversion
What happened with this apple photo?
These are actual outputs from one recorded apple-photo run. The construction and instructions are drafts; this example has not been crocheted.
This run produced the upper apple shape and stalk, but stopped before completing the lower body. The construction is incomplete and still has open boundaries.
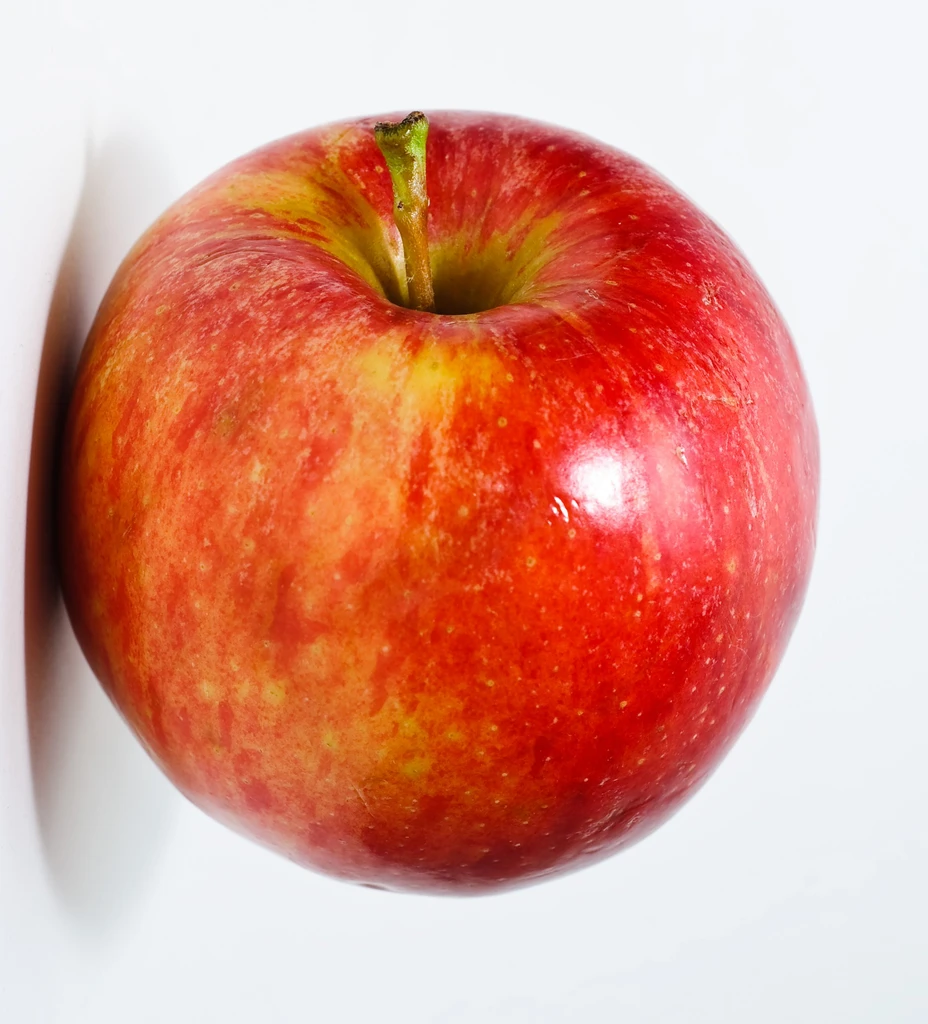
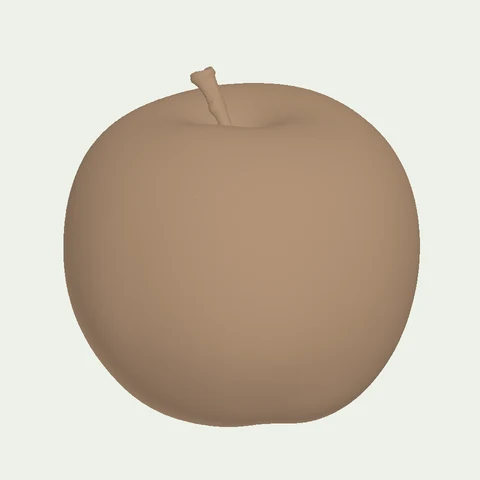
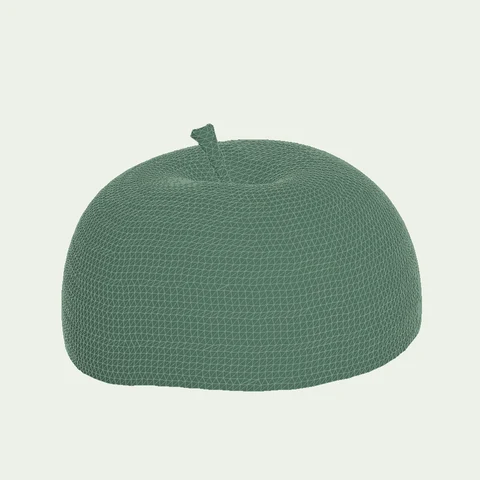
Photo: Red Apple by Abhijit Tembhekar, CC BY 2.0. Rotated 90 degrees clockwise and proportionally resized to fit 1024 by 1024 pixels; no scene content added. The model views are separately framed and do not establish a finished size.

From the saved English draft
chain (ch) (consume 0 → produce 1)
One source action, not a complete set of making instructions.
Prepare the reference.
For this run, the licensed photo was rotated and resized before image-to-model generation. The first view shows that input.
Inspect the target shape.
Compare the silhouette, body and stalk with the photo. A generated mesh also contains hidden surfaces that cannot be verified from this single view. Geometry generation does not establish stitch colors or yarn texture.
Inspect the construction and draft.
The saved model was processed through the local conversion pipeline. Its target height of 100 mm and stitch width of 2 mm were planning inputs; no physical yarn swatch or finished measurement is established by these views.
Two offline runs used the same saved model. A 5 mm planning stitch width produced only a small fragment and failed syntax checks. A 2 mm planning stitch width produced the upper body and stalk, but left the lower body unfinished. Neither setting is a measured yarn gauge.
What still needs work?
- Filling order still needs review
- The sections that need filling have not been confirmed
- Parts of the construction are still open
- Shape generation stopped before the construction was finished
- Some sections have not had their stitch counts checked
- Displayed rounds are not fully matched to the construction
- Some instructions cannot yet be located precisely in the construction view
Resolve these items before relying on the draft for making.
Is this the same as a photo-to-crochet chart tool?
No. Flat chart tools arrange colors on a stitch grid, for example for tapestry or C2C crochet. Photo to Crochet focuses on the shape and making plan of a three-dimensional project. It does not produce flat pixel or tapestry charts.
A shaped crochet project
Reference photo → proposed 3D shape → making draft.
A flat color chart
Image colors → cells on a grid → a flat stitch chart.
What makes a useful reference photo?
Start with one clearly visible subject and an uncluttered background. Simple toys, rounded forms, and an unobstructed view are useful starting references. Choose an image you have the right to upload.
- Keep the full outline visible so important parts are not cropped away.
- Prefer clear proportions over a dramatic camera angle.
- Expect hidden parts, thin branches and small details to need interpretation.
- Check important color markings separately; matching a shape does not establish matching colorwork.
The upload area accepts JPEG, PNG and WebP. Its current size limit and processing information appear before you submit.
Which features should I review after conversion?
Compare the proposed target shape with the parts of your reference that matter most: its silhouette, proportions and distinctive features. A plausible 3D shape may still leave out a thin part, change a face or interpret a hidden surface differently.
Check color markings separately from shape, and read the making steps for details that are absent from the preview. If a feature essential to your project is missing or an action remains unresolved, revise the draft before depending on it.
The current public sphere case demonstrates the local model-to-plan stage using synthetic geometry. It does not establish photo interpretation or feature preservation.
How is photo conversion intended to work?
The steps below describe the planned photo-based workflow. The current free demo uses a fixed sample shape instead of converting your image.
Choose your reference and settings.
Upload your image and review the project settings, including the available size and stitch measurements. Confirm processing consent before continuing.
Review the proposed shape.
Check the outline and important features. Choose the upright direction before using the shape for a making draft.
Read the draft with its preview.
Inspect the proposed steps and any unresolved items. Where a complete model plan is available, its referenced construction points can help explain the instructions.
For the meaning of each view, read understanding your crochet preview and instructions.
Can I use AI-generated instructions straight away?
Treat Photo to Crochet's output as a draft to review. Read its individual statuses and unresolved items first; current outputs have not been physically test-crocheted. A complete model plan and a finished, tested pattern are different things.
Check the language, making order, materials and measurements before starting. Materials, tension and stuffing can affect the physical result. Our specific model checks explain what the available evidence supports.
If an instruction cannot be located, required materials are missing, or a making action is unresolved, pause and revise rather than treating a rendered shape as proof of a usable pattern. The actual instruction example shows one relationship that can be checked. One local model test cannot establish whether all AI patterns work.
How do yarn, gauge and size affect the result?
The size and stitch measurements entered in this tool are planning inputs, not a measurement of your finished crochet. Changing yarn, hook size or tension can change the physical dimensions; a model's dimensions alone do not establish a finished size.
Check a swatch using your intended yarn and hook before relying on a size estimate. The Craft Yarn Council's crochet gauge guide explains measuring stitches and rows in a swatch and adjusting the hook when the gauge differs.
Record the yarn, hook, measured gauge, instruction version and actual dimensions when testing a draft. The sphere case has no such physical measurement record, so it cannot supply a tested hook/yarn combination, an exact size conversion or a finished-size guarantee.